Step 1
- As an administrator on your Microsoft Entra account, go to the Microsoft Entra Admin Portal and click through to Identity > Apps > Enterprise Applications.

Step 2
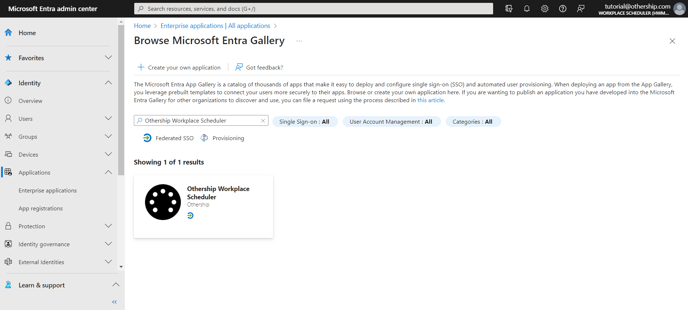
- You will see a list of any existing apps. Click the New Application and type Othership Workplace Scheduler in the search box.
- Select Othership Workplace Scheduler from the results panel and select Create. Wait a few seconds while the app is added to your tenant.
Step 3
- After adding the app browse to Identity > Applications > Enterprise applications > Othership Workplace Scheduler > Single sign-on.
- On the Select a single sign-on method page, select SAML.

Step 4
- Click the pencil icon for Basic SAML Configuration to edit the settings. Check the default values match the below and click save.
- Identifier (Entity ID) = https://hwms-api.othership.com
- Reply URL (Assertion Consumer Service URL) = https://hwms-api.othership.com/api/v1/org/auth-social/saml/azure/callback

- Click the pencil icon in the Attributes & Claims section. NCheck you have the three additional metadata attributes below assigned to your users. Please note that they are case-sensitive:
- email = user.mail
- first_name = user.givenname
- last_name = surname

- In the SAML Certificates section download the Federation Metadata XML file.

- On the Set up Othership Workplace Scheduler section, copy the URLs for use in Step 6.

Step 5
- Browse to Identity > Applications > Enterprise applications > Othership Workplace Scheduler > Overview
- Select Assign users and group

- In the Users and groups dialog, select users from the Users list, then click the Select button at the bottom of the screen.
- If you are expecting a role to be assigned to the users, you can select it from the Select a role dropdown. If no role has been set up for this app, you see "Default Access" role selected.
- In the Add Assignment dialog, click the Assign button.

Step 6
- Go to the Workplace Scheduler and then choose Settings > Organisation Integrations.
- Add your IDP by clicking SAMLE 2.0 > +Add to bring up configuration options.
- Select from Provider: Microsoft Entra ID

- In the Add SAML Configuration page, perform the following steps
- Select Microsoft Entra ID as a Provider from the drop-down.
- In the SAML SSO (Sign On URL) text box, paste the Login URL value, which you have copied from the Microsoft Entra admin center.
- In the Identity Provider Issuer textbox, paste the Microsoft Entra Identifier value, which you have copied from the Microsoft Entra admin center.
- For the Metadata file, upload the Federation Metadata XML that you downloaded in Step 4 and this will then autofill the Public Certificate section for you.
- Click Save Configuration.

Step 7
- Save this form, then go to My Apps. From the App List you will now see the new SAML App. Then anyone who has access to this can sign in using this link.
