Step 1:
As an administrator on your Google account, go to the Admin Portal and click through to Apps > Web and mobile apps.

Step 2:
You will see a list of any existing SAML apps. Click the Add app and select Add custom SAML app to add a new one.

Step 3: Basic App Information
Name the SAML app and upload Othership's icon to make it easy to find.
Right-click the image below to save the Othership's icon.


Step 4: Google IDP Information
You will then see your specific Identity Provider information. Go to the next step and don't worry about copying this information as we will come back for it later.

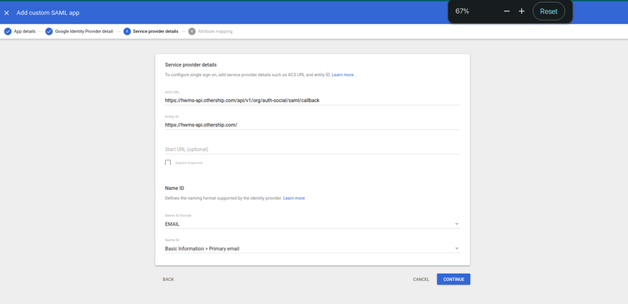
Step 5: Add the below Service Provider Details
- ACS URL(Assertion Consumer Service) = https://hwms-api.othership.com/api/v1/org/auth-social/saml/callback
- Entity ID = https://hwms-api.othership.com
- Start URL = Leave empty
- Signed Response = Check this box
- Name ID Format = EMAIL
- Name ID = Select "Basic Information" and "Primary Email"
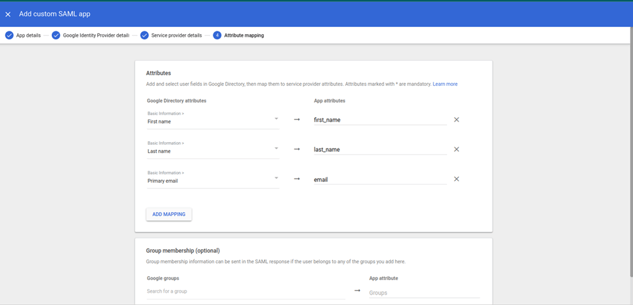
Step 6: Attribute Mapping
In the final step, you will need to map three metadata attributes to your Google Workspace users. They are case-sensitive:
- Primary Email = email
- First Name = first_name
- Last Name = last_name
Step 7: Enable the App for Users
- Expand the User Access section.

- Set service status: ON for everyone and click 'Save'.

When turned on, the Othership Workplace Scheduler will show up in everyone's app dropdown along with existing SAML apps. You may need to click "More" first to see the complete list of available apps.

Step 8:
- Go back to the Google Workspace Admin page
- Click on 'DOWNLOAD METADATA' and keep this tab open, you will need to add the SAML SSO URL, Identity Provider Issuer and Public Certificate during the next steps.

Step 9: Adding your IDP to HWMS.
- Log in to your Workplace Scheduler account.
- Head to Settings > Organisation Integrations.
- In SAML 2.0, click on the '+Add' button.

Step 10:
- Select from Provider: Google Workspace
- SAML SSO URL: Use the SSO URL from the METADATA downloaded earlier
- Identity Provider Issuer: Use Entity ID from the METADATA downloaded earlier
- Public Certificate: Use the certificate from the METADATA downloaded earlier
- After that click on 'Save Configuration'.
